08-k8s存储

摘要

本文内容转自网络,个人学习记录使用,请勿传播

为什么需要存储卷

容器中的文件在磁盘上是临时存放的,这给容器中运行比较重要的应用程序带来一些问题。

  • 当容器异常崩溃退出时,kubelet会重建容器,容器中的文件会丢失
  • 一个pod中运行多个容器可能需要共享文件

Kubernets的卷(Volume)可以解决上述问题

数据卷概述

  • 节点本地数据卷:hostPathemptyDir
  • 网络卷:NFSCephFlusterFS
  • 公有云:AWSEBS
  • K8S资源:configmapsecret

image-20210928122851450

临时数据卷、节点数据卷、网络数据卷

emptyDir

emptyDir是一个临时存储卷,与Pod生命周期绑定在一起,如果Pod删除了卷也会被删除

  • 应用场景:Pod中容器之间数据共享
1
2
3
4
5
6
7
8
9
10
11
12
13
14
15
16
17
18
19
20
21
22
23
24
25
26
27
28
29
30
31
32
apiVersion: apps/v1
kind: Deployment
metadata:
labels:
app: deploy-empty
name: deploy-empty
spec:
replicas: 1
selector:
matchLabels:
app: deploy-empty
template:
metadata:
labels:
app: deploy-empty
spec:
containers:
- image: centos
name: write
command: ["bash","-c","for i in {1..100};do echo $i >> /data/hello;sleep 1;done"]
volumeMounts:
- name: data
mountPath: /data
- image: centos
name: read
command: ["bash","-c","tail -f /data/hello"]
volumeMounts:
- name: data
mountPath: /data
volumes:
- name: data
emptyDir: {}

验证

1
2
3
4
5
6
7
8
9
10
11
12
13
14
$ kubectl apply -f emptyDir.yaml
$ kubectl get pod -l app=deploy-empty
NAME READY STATUS RESTARTS AGE
deploy-empty-766889b988-swgp4 2/2 Running 1 2m45s

$ kubectl logs -f deploy-empty-766889b988-swgp4 -c read
8
9
10
11
12
13
14
...

emptydir工作目录:/var/lib/kubelet/pods/<pod-id>/volumes/kubernetes.io~empty-dir

通过docker ps命令可以获取pod-id

hostPath

将pod所在的node节点上的文件系统上的文件或目录挂载到pod的容器中。

  • 应用场景:pod中的容器需要访问宿主机文件或容器中一些文件需要在宿主机留存
  • 可以将宿主机任意文件或目录挂载到容器中
  • 可以通过目录挂载对宿主机进程等信息进行监控
1
2
3
4
5
6
7
8
9
10
11
12
13
14
15
16
17
18
19
20
21
22
23
24
25
26
27
28
29
30
31
apiVersion: apps/v1
kind: Deployment
metadata:
labels:
app: deploy-hostpath
name: deploy-hostpath
spec:
replicas: 1
selector:
matchLabels:
app: deploy-hostpath
template:
metadata:
labels:
app: deploy-hostpath
spec:
containers:
- image: busybox
name: busybox
args:
- /bin/sh
- -c
- sleep 36000
volumeMounts:
- name: data
mountPath: /data
volumes:
- name: data
hostPath:
path: /tmp
type: Directory

网络数据卷nfs

提供对nfs挂载支持,可以自动将nfs共享路径挂载到Pod中

官方volume文档,支持很多种网络卷https://kubernetes.io/zh/docs/concepts/storage/volumes/

image-20210928231726647

安装nfs

1
2
3
4
5
6
7
8
9
10
11
$ yum install nfs-utils -y
$ vim /etc/exports
/home/work/kubernetes *(rw,no_root_squash)
$ mkdir -p /home/work/kubernetes
$ systemctl start nfs
$ systemctl enable nfs

# 所有节点都要安装nfs-utils才能挂载
$ yum install nfs-utils -y
# 挂载测试
$ mount -t nfs 192.168.31.63:/home/work/kubernetes /home/work/data

资源清单

1
2
3
4
5
6
7
8
9
10
11
12
13
14
15
16
17
18
19
20
21
22
23
24
25
26
27
28
29
30
31
32
33
34
35
36
37
38
39
40
41
42
apiVersion: apps/v1
kind: Deployment
metadata:
name: nginx-nfs
spec:
selector:
matchLabels:
app: nginx-nfs
replicas: 3
template:
metadata:
labels:
app: nginx-nfs
spec:
containers:
- name: nginx
image: nginx:1.17.10
volumeMounts:
- name: wwwroot
mountPath: /usr/share/nginx/html
ports:
- containerPort: 80
volumes:
- name: wwwroot
nfs:
server: 192.168.31.63
path: /home/work/kubernetes
---
apiVersion: v1
kind: Service
metadata:
labels:
app: nginx-nfs
name: nginx-nfs
spec:
type: NodePort
ports:
- port: 80
protocol: TCP
targetPort: 80
selector:
app: nginx-nfs

验证

1
2
3
4
5
6
7
8
9
10
11
12
13
14
$ kubectl get pod -l app=nginx-nfs -w
NAME READY STATUS RESTARTS AGE
nginx-nfs-79686d7cf6-jbpw4 1/1 Running 0 4m14s
nginx-nfs-79686d7cf6-lgg88 1/1 Running 0 4m14s
nginx-nfs-79686d7cf6-xcn8n 1/1 Running 0 4m14s

$ kubectl exec -it nginx-nfs-79686d7cf6-jbpw4 bash
$ df
Filesystem 1K-blocks Used Available Use% Mounted on
192.168.31.63:/home/work/kubernetes 82438144 9139200 69088256 12% /usr/share/nginx/html
$ cd /usr/share/nginx/html/
$ echo hello > index.html
$ curl http://10.252.32.69:8566/
hello

持久数据卷概述

  • PersistentVolume(PV):对存储资源创建和使用的抽象,将存储抽象成k8s集群中的资源进行管理
  • PersistentVolumeClaim(PVC):让用户不需要关心具体的Volume实现细节,不用关心卷的实现

k8s集群将存储抽象成PV,通过PV来创建PVC,Pod申请PVC作为卷来使用时,k8s集群将PVC挂载到Pod中

PV和PVC使用流程

  • 创建pvc时,k8s集群会自动去匹配pv,从合适的pv中创建pvc

资源清单

1
2
3
4
5
6
7
8
9
10
11
12
13
14
15
16
17
18
19
20
21
22
23
24
25
26
27
28
29
30
31
32
33
34
35
36
37
38
39
40
41
42
43
44
45
46
47
48
49
50
51
52
53
54
55
56
57
58
59
60
61
62
63
64
65
66
67
68
69
70
71
72
73
74
75
# 使用nfs存储创建pv
apiVersion: v1
kind: PersistentVolume
metadata:
name: my-pv001
spec:
capacity:
storage: 5Gi
accessModes:
- ReadWriteMany
persistentVolumeReclaimPolicy: Recycle
nfs:
server: 10.252.32.67
path: /home/work/kubernetes/pv001

---

# 创建pvc
apiVersion: v1
kind: PersistentVolumeClaim
metadata:
name: my-pvc
spec:
accessModes:
- ReadWriteMany
resources:
requests:
storage: 5Gi

---

# 使用pvc
apiVersion: apps/v1
kind: Deployment
metadata:
name: nginx-pvc
spec:
selector:
matchLabels:
app: nginx-pvc
replicas: 3
template:
metadata:
labels:
app: nginx-pvc
spec:
containers:
- name: nginx
image: nginx:1.17.10
volumeMounts:
- name: wwwroot
mountPath: /usr/share/nginx/html
ports:
- containerPort: 80
volumes:
- name: wwwroot
persistentVolumeClaim:
claimName: my-pvc

---

apiVersion: v1
kind: Service
metadata:
labels:
app: nginx-pvc
name: nginx-pvc
spec:
type: NodePort
ports:
- port: 80
protocol: TCP
targetPort: 80
selector:
app: nginx-pvc

验证

1
2
3
4
5
6
$ kubectl get pv,pvc
NAME CAPACITY ACCESS MODES RECLAIM POLICY STATUS CLAIM STORAGECLASS REASON AGE
persistentvolume/my-pv 5Gi RWX Recycle Bound default/my-pvc 31m

NAME STATUS VOLUME CAPACITY ACCESS MODES STORAGECLASS AGE
persistentvolumeclaim/my-pvc Bound my-pv 5Gi RWX 31m

pv和pvc的关系

  • pv和pvc是一对一的对应关系
  • 一个deploy可以使用多个卷和pvc

pv和pvc的匹配模式

  • 存储容量

    • 匹配容量最接近的pv
    • 如果无法满足则处于pending状态
    • 容量不是用于限制,只是一种标记方式,pv的存储容量是由实际的存储后端决定的
  • 访问模式

PV生命周期

访问模式AccessModes

AccessModes 是用来对 PV 进行访问模式的设置,用于描述用户应用对存储资源的访问权限,访问权限包括下面几种方式:

  • ReadWriteOnce(RWO):读写权限,但是只能被单个节点挂载
  • ReadOnlyMany(ROX):只读权限,可以被多个节点挂载
  • ReadWriteMany(RWX):读写权限,可以被多个节点挂载

回收策略RECLAIM POLICY

目前 PV 支持的策略有三种:

  • Retain(保留): 保留数据,需要管理员手工清理数据

  • Recycle(回收):清除 PV 中的数据,效果相当于执行 rm -rf /ifs/kuberneres/*

  • Delete(删除):与 PV 相连的后端存储同时删除

PV状态STATUS

一个 PV 的生命周期中,可能会处于4中不同的阶段:

  • Available(可用):表示可用状态,还未被任何 PVC 绑定
  • Bound(已绑定):表示 PV 已经被 PVC 绑定
  • Released(已释放):PVC 被删除,但是资源还未被集群重新声明
  • Failed(失败): 表示该 PV 的自动回收失败

静态供给

在项目部署前,提前创建一些pv的使用方式叫做静态供给,缺点是维护成本太高了,通常可以使用pv动态供给的方式来提升pv管理效率

如使用nfs这类存储作为pv,需要管理员提权创建多个目录用于不同pv

image-20211012142420263

PV动态供给StorageClass

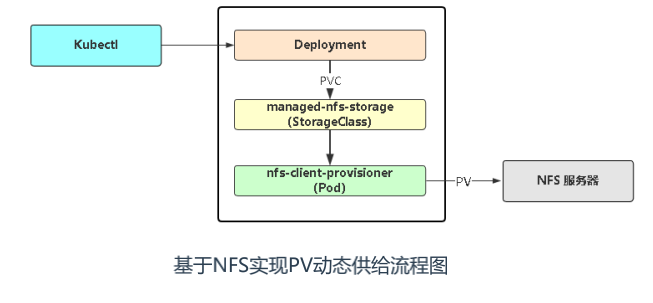
使用pv动态供给的方式,每次创建pvc无需再提前创建pv

image-20211012142517473

image-20211012142533904

基于nfs的动态供给

K8s默认不支持NFS动态供给,需要单独部署社区开发的插件。

项目地址:https://github.com/kubernetes-sigs/nfs-subdir-external-provisioner

1
2
3
4
5
6
7
8
9
10
11
12
13
14
15
16
17
18
19
20
21
22
23
24
25
26
27
28
29
30
31
32
33
34
35
36
37
38
$ wget https://github.com/kubernetes-sigs/nfs-subdir-external-provisioner/archive/refs/tags/nfs-subdir-external-provisioner-4.0.14.tar.gz
$ tar xf nfs-subdir-external-provisioner-4.0.14.tar.gz
$ cd nfs-subdir-external-provisioner-nfs-subdir-external-provisioner-4.0.14/deploy
# 修改deployment.yaml
image: lizhenliang/nfs-subdir-external-provisioner:v4.0.1
volumeMounts:
- name: nfs-client-root
mountPath: /persistentvolumes
env:
- name: PROVISIONER_NAME
value: k8s-sigs.io/nfs-subdir-external-provisioner
- name: NFS_SERVER
value: 10.252.32.67
- name: NFS_PATH
value: /home/work/kubernetes
volumes:
- name: nfs-client-root
nfs:
server: 10.252.32.67
path: /home/work/kubernetes
$ cat class.yaml
apiVersion: storage.k8s.io/v1
kind: StorageClass
metadata:
name: managed-nfs-storage
provisioner: k8s-sigs.io/nfs-subdir-external-provisioner # or choose another name, must match deployment's env PROVISIONER_NAME'
parameters:
# false默认删除pvc的时候自动删除pv和数据,true会自动归档备份
archiveOnDelete: "false"


# 部署
$ kubectl apply -f rbac.yaml
$ kubectl apply -f deployment.yaml
$ kubectl apply -f class.yaml
$ kubectl get sc
NAME PROVISIONER RECLAIMPOLICY VOLUMEBINDINGMODE ALLOWVOLUMEEXPANSION AGE
managed-nfs-storage k8s-sigs.io/nfs-subdir-external-provisioner Delete Immediate false 47s

资源清单

1
2
3
4
5
6
7
8
9
10
11
12
13
14
15
16
17
18
19
20
21
22
23
24
25
26
27
28
29
30
31
32
33
34
35
36
37
38
39
40
41
42
43
44
45
46
47
48
49
50
51
52
53
54
55
56
57
apiVersion: v1
kind: PersistentVolumeClaim
metadata:
name: test-claim
spec:
storageClassName: "managed-nfs-storage"
accessModes:
- ReadWriteMany
resources:
requests:
storage: 1Gi

---

apiVersion: apps/v1
kind: Deployment
metadata:
name: nginx-sc
spec:
selector:
matchLabels:
app: nginx-sc
replicas: 3
template:
metadata:
labels:
app: nginx-sc
spec:
containers:
- name: nginx
image: nginx:1.17.10
volumeMounts:
- name: wwwroot
mountPath: /usr/share/nginx/html
ports:
- containerPort: 80
volumes:
- name: wwwroot
persistentVolumeClaim:
claimName: test-claim

---

apiVersion: v1
kind: Service
metadata:
labels:
app: nginx-sc
name: nginx-sc
spec:
type: NodePort
ports:
- port: 80
protocol: TCP
targetPort: 80
selector:
app: nginx-sc

有状态应用部署:StatefulSet 工作负载均衡器

无状态和有状态

Deployment控制器设计原则:管理的所有Pod一模一样,提供同一个服务,也不考虑在哪台Node运行,可随意扩容和缩容。这种应用称为“无状态”,例如Web服务。

在实际的场景中,这并不能满足所有应用,尤其是分布式应用,会部署多个实例,这些实例之间往往有依赖关系,例如主从关系、主备关系,这种应用称为”有状态”,例如MySQL主从、Etcd集群。

  • 无状态:所有pod都是相同的状态
  • 有状态:pod之间存在一些差异,不对等关系

deployment 无状态应用

daemonset 守护进程应用

statefulSet 有状态应用

StatefulSet

  • 部署有状态的应用
  • 解决Pod独立生命周期,保持Pod启动顺序和唯一性
    • 稳定:唯一的网络标识、持久存储
    • 有序:优雅的部署和扩展、删除、终止和滚动更新
  • 应用场景:分部署应用、数据库集群

参考文档:https://kubernetes.io/docs/concepts/workloads/controllers/statefulset/

稳定的网络ID

1
2
3
使用Headless Service(相比普通Service只是将spec.clusterIP定义为None)来维护Pod网络身份。
并且添加serviceName: “nginx”字段指定StatefulSet控制器要使用这个Headless Service。
DNS解析名称:<statefulsetName-index>.<service-name>.<namespace-name>.svc.cluster.local

稳定的存储

1
2
StatefulSet的存储卷使用VolumeClaimTemplate创建,称为卷申请模板,当StatefulSet使用
VolumeClaimTemplate创建一个PersistentVolume时,同样也会为每个Pod分配并创建一个编号的PVC。

资源清单

1
2
3
4
5
6
7
8
9
10
11
12
13
14
15
16
17
18
19
20
21
22
23
24
25
26
27
28
29
30
31
32
33
34
35
36
37
38
39
40
41
42
43
44
45
46
47
48
# cat nginx.yaml
apiVersion: v1
kind: Service
metadata:
name: web-sts
labels:
app: sts
spec:
ports:
- port: 80
name: web
clusterIP: None
selector:
app: sts
---
apiVersion: apps/v1
kind: StatefulSet
metadata:
name: web-sts
spec:
serviceName: "web-sts"
replicas: 2
selector:
matchLabels:
app: sts
template:
metadata:
labels:
app: sts
spec:
containers:
- name: sts
image: nginx:1.17.10
ports:
- containerPort: 80
name: web
volumeMounts:
- name: www
mountPath: /usr/share/nginx/html
volumeClaimTemplates:
- metadata:
name: www
spec:
accessModes: [ "ReadWriteOnce" ]
storageClassName: "managed-nfs-storage"
resources:
requests:
storage: 1Gi
1
2
3
4
5
6
7
8
9
10
11
12
13
14
15
16
17
18
19
20
21
22
23
24
25
26
27
28
29
30
31
32
33
34
35
# 使用动态供给的存储
# kubectl get sc
NAME PROVISIONER RECLAIMPOLICY VOLUMEBINDINGMODE ALLOWVOLUMEEXPANSION AGE
local-data kubernetes.io/no-provisioner Delete WaitForFirstConsumer false 155d
managed-nfs-storage k8s-sigs.io/nfs-subdir-external-provisioner Delete Immediate false 120d

# kubectl get pod -o wide -l app=sts
NAME READY STATUS RESTARTS AGE IP NODE NOMINATED NODE READINESS GATES
web-sts-0 1/1 Running 0 3m28s 10.244.89.179 kube-node-01.epc.isme.com <none> <none>
web-sts-1 1/1 Running 0 3m22s 10.244.115.24 kube-0-1.epc.isme.com <none> <none>
web-sts-2 1/1 Running 0 50s 10.244.89.186 kube-node-01.epc.isme.com <none> <none>

# kubectl get svc -l app=sts
NAME TYPE CLUSTER-IP EXTERNAL-IP PORT(S) AGE
web-sts ClusterIP None <none> 80/TCP 12m

# busybox镜像使用1.28.3版本,新版本镜像解析有问题
# kubectl exec -it network-pod -c tools -- sh
/ # nslookup web-sts
Server: 10.96.0.10
Address 1: 10.96.0.10 kube-dns.kube-system.svc.cluster.local

Name: web-sts
Address 1: 10.244.115.24 web-sts-1.web-sts.default.svc.cluster.local
Address 2: 10.244.89.179 web-sts-0.web-sts.default.svc.cluster.local
Address 3: 10.244.89.186 web-sts-2.web-sts.default.svc.cluster.local

# 解析无头服务获取到的解析记录是3个pod的ip,不是集群ip

# 存储也是和pod一一对应的
# kubectl get pvc -o wide
NAME STATUS VOLUME CAPACITY ACCESS
www-web-sts-0 Bound pvc-49e6b1be-a0f5-4a31-b630-51411a671a2a 1Gi RWO managed-nfs-storage 16m Filesystem
www-web-sts-1 Bound pvc-ea2c6874-215a-4943-914a-22dd28b93f15 1Gi RWO managed-nfs-storage 16m Filesystem
www-web-sts-2 Bound pvc-6e85aa12-3378-46a1-90c2-ade99551814d 1Gi RWO managed-nfs-storage 14m Filesystem
  • StatefulSet与Deployment的区别:sts是有身份的
  • 身份的三要素:
    • 域名
    • 主机名
    • 存储(PVC)

应用程序配置文件存储:ConfigMap

ConfigMap主要用于存储配置文件

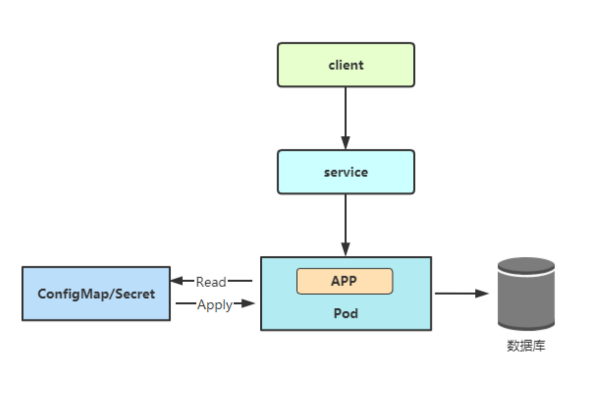
创建ConfigMap之后,数据会存储在k8s的etcd中,通过创建pod来使用该数据

Pod使用ConfigMap数据有两种方式:

  • 变量注入
  • 数据卷挂载

资源清单

ConfigMap有两种数据类型

  • 键值对
  • 多行数据
1
2
3
4
5
6
7
8
9
10
11
12
13
14
15
16
17
18
19
20
21
22
23
24
25
26
27
28
29
30
31
32
33
34
35
36
37
38
39
40
41
42
43
# cat config-demo.yaml
apiVersion: v1
kind: ConfigMap
metadata:
name: configmap-demo
data:
abc: "123"
cde: "456"
redis.properties: |
port: 6379
host: 192.168.31.10

---
apiVersion: v1
kind: Pod
metadata:
name: configmap-demo-pod
spec:
containers:
- name: demo
image: nginx
env:
- name: ABCD
valueFrom:
configMapKeyRef:
name: configmap-demo
key: abc
- name: CDEF
valueFrom:
configMapKeyRef:
name: configmap-demo
key: cde
volumeMounts:
- name: config
mountPath: "/config"
readOnly: true
volumes:
- name: config
configMap:
name: configmap-demo
items:
- key: "redis.properties"
path: "redis.properties"

验证

1
2
3
4
5
6
7
# kubectl exec -it configmap-demo-pod -- sh
# env | grep -E "ABCD|CDEF"
ABCD=123
CDEF=456
# cat config/redis.properties
port: 6379
host: 192.168.31.10

敏感数据存储:Secret

  • SecretConfigMap类似,主要用于存储敏感数据、敏感信息等,所有数据都要经过base64编码

应用场景:凭证信息

kubectl create secret支持三种数据类型

  • docker-registr:存储镜像仓库认证信息
  • generic:从文件、目录或者字符串创建,例如存储用户名、密码
  • tls:存储证书,例如HTTPS证书

资源清单

1
2
3
4
5
将用户名密码先进行base64编码
# echo -n 'admin' | base64
YWRtaW4=
# echo -n '1f2d1e2e67df' | base64
MWYyZDFlMmU2N2Rm
1
2
3
4
5
6
7
8
9
10
11
12
13
14
15
16
17
18
19
20
21
22
23
24
25
26
27
28
29
30
31
32
33
34
35
36
37
38
39
40
41
# cat secret-demo.yaml
apiVersion: v1
kind: Secret
metadata:
name: db-user-pass
type: Opaque
data:
username: YWRtaW4=
password: MWYyZDFlMmU2N2Rm

---
apiVersion: v1
kind: Pod
metadata:
name: secret-demo-pod
spec:
containers:
- name: demo
image: nginx
env:
- name: USER
valueFrom:
secretKeyRef:
name: db-user-pass
key: username
- name: PASS
valueFrom:
secretKeyRef:
name: db-user-pass
key: password
volumeMounts:
- name: config
mountPath: "/config"
readOnly: true
volumes:
- name: config
secret:
secretName: db-user-pass
items:
- key: username
path: my-username

验证

1
2
3
4
5
6
# kubectl exec -it secret-demo-pod -- sh
# env | grep -E "USER|PASS"
USER=admin
PASS=1f2d1e2e67df
# cat config/my-username
admin